版权声明:本文为博主-阿飞(dufyun)-原创文章,未经博主允许可转载,但请标明出处,谢谢! https://blog.csdn.net/u010648555/article/details/81294124
我为什么 看的不够远,因为高度不够!
学习和整理总结Spring容器的功能扩展,本文为学习笔记,其中有一些内容是自己的思考总结!
一、两种Spring中bean加载的方式
第一种
# 第一种使用 BeanFactory 以及它默认的实现类 XmlBeanFactory
BeanFactory bf = new XmlBeanFactory(new ClassPathResource("beanFactoryTest.xml"));
# 注:XmlBeanFactory这种方式已经在最新的Spring5中已经被标记为@Deprecated!
第二种
# 第二种使用 ApplicationContext 以及它的实现类 ClassPathXmlApplicationContext
ApplicationContext context = new ClassPathXmlApplicationContext("beanFactoryTest.xml");
BeanFactory 和 ApplicationContext 都是用于加载Bean的,对比之下 ApplicationContext 包含了BeanFactory 所有的功能,并提供了更多的扩展。
下面是ApplicationContext的类图:
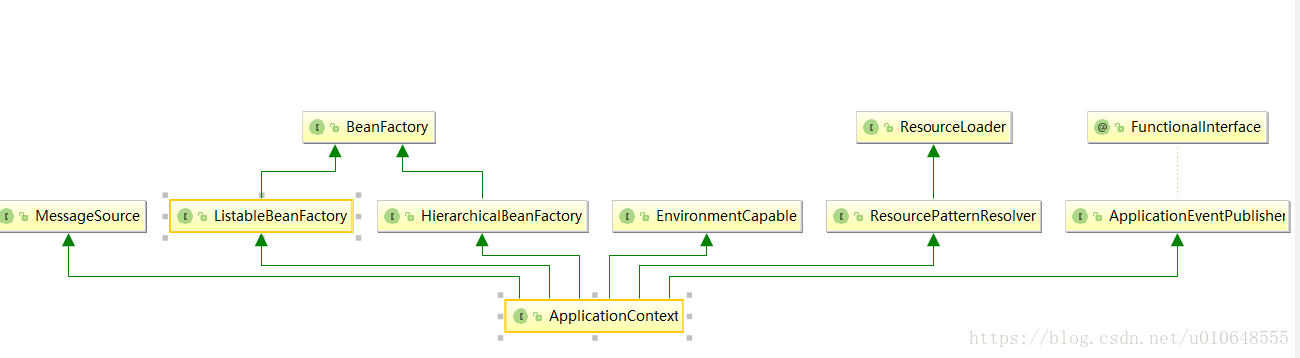
从类图上看, ApplicationContext是BeanFactory 的子类!子类继承了父类所有的功能,并在父类的基础上添加了一些功能,在大多数时候,ApplicationContext 就是你所需要的!
二、从 new ClassPathXmlApplicationContext(“beanFactoryTest.xml”)开启源码之旅
1、构造函数
/**
* Create a new ClassPathXmlApplicationContext,loading the definitions
* from the given XML file and automatically refreshing the context.
* 创建一个新的ClassPathXmlApplicationContext,加载定义
* 从给定的XML文件中自动刷新上下文。
* @param configLocation resource location
* @throws BeansException if context creation failed
*/
public ClassPathXmlApplicationContext(String configLocation) throws BeansException {
this(new String[] {configLocation},true,null);
}
/**
* 1.设置配置路径
* 2,refesh 扩展功能
*/
public ClassPathXmlApplicationContext(
String[] configLocations,boolean refresh,@Nullable ApplicationContext parent)
throws BeansException {
super(parent);
setConfigLocations(configLocations);
if (refresh) {
refresh();
}
}
2 具体的setConfigLocations 和 refresh
2.1 设置配置路径
/**
* Set the config locations for this application context.
* 设置此应用程序上下文的配置位置。
* <p>If not set,the implementation may use a default as appropriate.
* 如果没有设置,实现可以适当地使用默认值。
*/
public void setConfigLocations(@Nullable String... locations) {
if (locations != null) {
Assert.noNullElements(locations,"Config locations must not be null");
this.configLocations = new String[locations.length];
for (int i = 0; i < locations.length; i++) {
// 解析给定路径
this.configLocations[i] = resolvePath(locations[i]).trim();
}
}
else {
this.configLocations = null;
}
}
此函数主要是用于解析给定的路径数组,如果路径中包含特殊字符,如${bar},那么resolvePath会搜寻匹配的系统变量并替换。
2.2 扩展功能
设置完路径后,就可以根据路径做配置文件的解析以及各种功能的实现了。refresh中包含了ApplicationContext中提供的全部功能。
public void refresh() throws BeansException,IllegalStateException {
// `startupShutdownMonitor` 同步监视器用于“刷新”和“销毁”。
synchronized (this.startupShutdownMonitor) {
// Prepare this context for refreshing.
// 准备刷新的上下文环境
prepareRefresh();
// Tell the subclass to refresh the internal bean factory.
// 初始话beanFactory,并及逆行XML文件读取
ConfigurableListableBeanFactory beanFactory = obtainFreshBeanFactory();
// Prepare the bean factory for use in this context.
// 对BeanFactory 进行各种功能填充
prepareBeanFactory(beanFactory);
try {
// Allows post-processing of the bean factory in context subclasses.
// 子类覆盖方法的额外处理,默认实现为空
postProcessBeanFactory(beanFactory);
// Invoke factory processors registered as beans in the context.
// 激活各种BeanFactory处理器
invokeBeanFactoryPostProcessors(beanFactory);
// Register bean processors that intercept bean creation.
// 注册拦截Bean的创建的处理器,这里只是注册,真正调用是在getBean时候
registerBeanPostProcessors(beanFactory);
// Initialize message source for this context.
// 为上下问初始化message源,既不同语言的消息体,国际化处理
initMessageSource();
// Initialize event multicaster for this context.
// 初始化应用消息广播器
initApplicationEventMulticaster();
// Initialize other special beans in specific context subclasses.
// 留给子类初始化其他的Bean,默认实现为空
onRefresh();
// Check for listener beans and register them.
// 在所有注册的Bean中查找Listener bean,注册到消息广播器中
registerListeners();
// Instantiate all remaining (non-lazy-init) singletons.
// 初始化剩下的单实例,非惰性的
finishBeanFactoryInitialization(beanFactory);
// Last step: publish corresponding event.
// 最后一步,完成刷新过程,通知生命周期处理器initLifecycleProcessor刷新过程,同时发出
// ContextRefreshedEvent通知别人
finishRefresh();
}
catch (BeansException ex) {
if (logger.isWarnEnabled()) {
logger.warn("Exception encountered during context initialization - " +
"cancelling refresh attempt: " + ex);
}
// Destroy already created singletons to avoid dangling resources.
// 销毁已经创建的单例,以避免悬空资源。
destroyBeans();
// Reset 'active' flag.
cancelRefresh(ex);
// Propagate exception to caller.
throw ex;
}
finally {
// Reset common introspection caches in Spring's core,since we
// might not ever need metadata for singleton beans anymore...
//重置Spring核心中的常见内省缓存,因为我们
//可能再也不需要单例bean的元数据了…
resetCommonCaches();
}
}
}
上面这一段代码,真的是值得学习,每个功能抽离出一个单独的方法实现,思路清晰,让看代码的人也神清气爽! 很多时候在开发项目中,一个业务功能的实现成百上千行,看着就头痛。
下面对refresh()中的过程进行简单概括:
初始化的准备工作,例如对系统属性或者环境变量进行准备及验证。
初始化BeanFactory ,并对XML文件读取。
对BeanFactory 进行各种功能填充。如 @Qualifier 和@Autowired这两个注解正是在这一步骤增加的支持。
子类覆盖方法做的额外处理。(这就是Spring强大的地方,除了功能强大,可扩展性也很强大。)
激活各种 BeanFactory 处理器。
注册拦截bean创建的bean处理器
为上下文初始化message源
初始化应用消息广播器
留着子类初始化其他的bean
在所有注册的bean中查找listener bean
初始化剩下的单实例
完成刷新过程。
2.2.1 环境准备 prepareRefresh()
初始化的准备工作,例如对系统属性或者环境变量进行准备及验证。
protected void prepareRefresh() {
// startupDate 当此上下文启动时的 系统时间(以毫秒为单位)
this.startupDate = System.currentTimeMillis();
// closed 标志,指示此上下文是否已经关闭
this.closed.set(false);
// active 标志,指示此上下文当前是否活动。
this.active.set(true);
if (logger.isInfoEnabled()) {
logger.info("Refreshing " + this);
}
// Initialize any placeholder property sources in the context environment
// 在上下文环境中初始化任何占位符属性源,默认实现为空,留给子类覆盖(实现个性化的需求)
initPropertySources();
// 验证需要的属性文件是否都已经放入环境中
getEnvironment().validateRequiredProperties();
// Allow for the collection of early ApplicationEvents,
// to be published once the multicaster is available...
//允许收集早期应用程序事件,
//一旦有了广播机,就可以发布……
this.earlyApplicationEvents = new LinkedHashSet<>();
}
准备这个上下文刷新,设置它的启动日期和主动标志,以及执行任何属性源的初始化。
2.2.2 加载BeanFactory的 obtainFreshBeanFactory()
obtainFreshBeanFactory 方法代表获取 BeanFactory !上面类图也可以看出ApplicationContext是BeanFactory的子类,经历过这个方法后,ApplicationContext 就拥有了 BeanFactory全部功能。
protected ConfigurableListableBeanFactory obtainFreshBeanFactory() {
// 初始化BeanFactory并进行XML的读取,并将得到的BeanFactory记录到当前的实体属性中
refreshBeanFactory();
// 返回当前实体的BeanFactory属性
ConfigurableListableBeanFactory beanFactory = getBeanFactory();
if (logger.isDebugEnabled()) {
logger.debug("Bean factory for " + getDisplayName() + ": " + beanFactory);
}
return beanFactory;
}
//# 核心方法为 refreshBeanFactory()
//# AbstractRefreshableApplicationContext.refreshBeanFactory()
protected final void refreshBeanFactory() throws BeansException {
if (hasBeanFactory()) {
destroyBeans();
closeBeanFactory();
}
try {
// 创建了 DefaultListableBeanFactory
DefaultListableBeanFactory beanFactory = createBeanFactory();
// 为了序列号指定ID,
beanFactory.setSerializationId(getId());
// 定制BeanFactory,设置相关属性
customizeBeanFactory(beanFactory);
// 初始化 DocumentReader,并进行XML文件读取及解析
loadBeanDefinitions(beanFactory);
synchronized (this.beanFactoryMonitor) {
this.beanFactory = beanFactory;
}
}
catch (IOException ex) {
throw new ApplicationContextException("I/O error parsing bean definition source for " + getDisplayName(),ex);
}
}
简述上述过程:
1. 创建 DefaultListableBeanFactory,这个是BeanFactory的子类,它提供了XmlBeanDefinitionReader 类型的reader属性,也就是说 DefaultListableBeanFactory 是容器的基础。
2. 指定序列号ID。
3. 定制BeanFactory。
4. 加载BeanDefinition。
5. 使用全局变量记录BeanFactory类的实例。
1、 定制BeanFactory,customizeBeanFactory(beanFactory)
从这里开始对BeanFactory的扩展,在基本容器的基础上,增加了是否允许覆盖,是否允许扩展的设置。并提供了注解 @Qualifier 和 @Autowired的支持。
protected void customizeBeanFactory(DefaultListableBeanFactory beanFactory) {
// 如果属性 allowBeanDefinitionOverriding 不为空,设置给 beanFactory 对象相应属性。
// 此属性含义:是否允许覆盖同名称的不同定义的对象
if (this.allowBeanDefinitionOverriding != null) {
beanFactory.setAllowBeanDefinitionOverriding(this.allowBeanDefinitionOverriding);
}
// 如果属性 allowBeanDefinitionOverriding 不为空,设置给 beanFactory 对象相应属性。
// 此属性含义:是否允许bean之间存在循环依赖
if (this.allowCircularReferences != null) {
beanFactory.setAllowCircularReferences(this.allowCircularReferences);
}
}
这里允许覆盖和允许依赖的设置只是判断了是否为空,其中setAllowBeanDefinitionOverriding()和 setAllowCircularReferences() 默认为 true! 子类可以通过覆盖方法修改默认值:
如下:
public class MyClassPathXmlApplicationContext extends ClassPathXmlApplicationContext {
@Override
protected void customizeBeanFactory(DefaultListableBeanFactory beanFactory) {
super.setAllowBeanDefinitionOverriding(false);
super.setAllowCircularReferences(false);
super.customizeBeanFactory(beanFactory);
}
}
2、加载BeanDefintion,loadBeanDefinitions(beanFactory)
/**
* Loads the bean definitions via an XmlBeanDefinitionReader.
* 加载 bean的定义 通过 XmlBeanDefinitionReader
* @see org.springframework.beans.factory.xml.XmlBeanDefinitionReader
* @see #initBeanDefinitionReader
* @see #loadBeanDefinitions
*/
@Override
protected void loadBeanDefinitions(DefaultListableBeanFactory beanFactory) throws BeansException,IOException {
// Create a new XmlBeanDefinitionReader for the given BeanFactory.
// 为指定的BeanFactory 创建 一个 XmlBeanDefinitionReader
XmlBeanDefinitionReader beanDefinitionReader = new XmlBeanDefinitionReader(beanFactory);
// Configure the bean definition reader with this context's
// resource loading environment.
// 对 beanDefinitionReader 进行 环境变量设置
beanDefinitionReader.setEnvironment(this.getEnvironment());
beanDefinitionReader.setResourceLoader(this);
beanDefinitionReader.setEntityResolver(new ResourceEntityResolver(this));
// Allow a subclass to provide custom initialization of the reader,
// then proceed with actually loading the bean definitions.
// 对 beanDefinitionReader 进行设置,可以覆盖
initBeanDefinitionReader(beanDefinitionReader);
// 通过指定的 XmlBeanDefinitionReader 加载 bean定义
loadBeanDefinitions(beanDefinitionReader);
}
// 加载bean的定义
protected void loadBeanDefinitions(XmlBeanDefinitionReader reader) throws BeansException,IOException {
Resource[] configResources = getConfigResources();
if (configResources != null) {
reader.loadBeanDefinitions(configResources);
}
String[] configLocations = getConfigLocations();
if (configLocations != null) {
reader.loadBeanDefinitions(configLocations);
}
}
加载beanDefinition的核心就是创建一个XmlBeanDefinitionReader 然后对配置文件的加载以及注册。
2.2.3 对BeanFactory 进行各种功能填充 prepareBeanFactory(beanFactory)
在进入prepareBeanFactory前,Spring已经完成了对配置的解析,ApplicationContext的扩展从这里也真正的展开了。
/**
* Configure the factory's standard context characteristics,
* such as the context's ClassLoader and post-processors.
* 配置工厂的标准上下文特性,例如上下文的类加载器和后处理器。
* @param beanFactory the BeanFactory to configure
*/
protected void prepareBeanFactory(ConfigurableListableBeanFactory beanFactory) {
// Tell the internal bean factory to use the context's class loader etc.
// 设置 beanFactory 的 ClassLoader 为当前 context 的ClassLoader。
beanFactory.setBeanClassLoader(getClassLoader());
// 设置 beanFactory 的 表达式语言处理器
beanFactory.setBeanExpressionResolver(new StandardBeanExpressionResolver(beanFactory.getBeanClassLoader()));
// 为beanFacotry 增加一个默认的 PropertyEditor,主要是对bean的属性等设置管理的一个工具
beanFactory.addPropertyEditorRegistrar(new ResourceEditorRegistrar(this,getEnvironment()));
// Configure the bean factory with context callbacks.
// 使用上下文回调配置bean工厂。增加了 BeanPostProcessor
beanFactory.addBeanPostProcessor(new ApplicationContextAwareProcessor(this));
// 设置 了几个 忽略自动装配的接口
beanFactory.ignoreDependencyInterface(EnvironmentAware.class);
beanFactory.ignoreDependencyInterface(EmbeddedValueResolverAware.class);
beanFactory.ignoreDependencyInterface(ResourceLoaderAware.class);
beanFactory.ignoreDependencyInterface(ApplicationEventPublisherAware.class);
beanFactory.ignoreDependencyInterface(MessageSourceAware.class);
beanFactory.ignoreDependencyInterface(ApplicationContextAware.class);
// BeanFactory interface not registered as resolvable type in a plain factory.
// MessageSource registered (and found for autowiring) as a bean.
// 在普通工厂中,BeanFactory接口未注册为可解析类型。
// MessageSource注册(用于自动连接)为bean。
beanFactory.registerResolvableDependency(BeanFactory.class,beanFactory);
beanFactory.registerResolvableDependency(ResourceLoader.class,this);
beanFactory.registerResolvableDependency(ApplicationEventPublisher.class,this);
beanFactory.registerResolvableDependency(ApplicationContext.class,this);
// Register early post-processor for detecting inner beans as ApplicationListeners.
// 注册早期后处理器,以检测内部bean作为应用程序监听器。
beanFactory.addBeanPostProcessor(new ApplicationListenerDetector(this));
// Detect a LoadTimeWeaver and prepare for weaving,if found.
// 检测一个LoadTimeWeaver并准备编织,如果找到的话。增加对 AspectJ的支持
if (beanFactory.containsBean(LOAD_TIME_WEAVER_BEAN_NAME)) {
beanFactory.addBeanPostProcessor(new LoadTimeWeaverAwareProcessor(beanFactory));
// Set a temporary ClassLoader for type matching.
// 为类型匹配设置临时类加载器。
beanFactory.setTempClassLoader(new ContextTypeMatchClassLoader(beanFactory.getBeanClassLoader()));
}
// Register default environment beans.
// 添的默认系统环境bean。
if (!beanFactory.containsLocalBean(ENVIRONMENT_BEAN_NAME)) {
beanFactory.registerSingleton(ENVIRONMENT_BEAN_NAME,getEnvironment());
}
if (!beanFactory.containsLocalBean(SYSTEM_PROPERTIES_BEAN_NAME)) {
beanFactory.registerSingleton(SYSTEM_PROPERTIES_BEAN_NAME,getEnvironment().getSystemProperties());
}
if (!beanFactory.containsLocalBean(SYSTEM_ENVIRONMENT_BEAN_NAME)) {
beanFactory.registerSingleton(SYSTEM_ENVIRONMENT_BEAN_NAME,getEnvironment().getSystemEnvironment());
}
}
综合上面的代码,上面的函数主要进行了几个方面的扩展:
增加了SPEL语言的支持。支持 #{…}方式调用相关属性。
增加了对属性编辑器的支持。
设置了一些内置类信息的注入。
设置了依赖功能可以忽略的接口。
注册一些固定依赖的属性。
增加了 AspectJ的支持。
添加默认系统环境bean。如属性注册和单实例模式注册。
1.增加SPEL语言的支持
SPEL:Spring 表达式语法,Spring Expression Language。能够在运行时候构建复杂表达式、存取对象属性,对象方法调用等。Spel是单独的模块,依赖Spring的core,解析过程是在Spring的expression包内。
简单举例:
<bean id="testSpel" value="org.xxx.xxx" />
<bean>
<property name="csdn" value="#{testSpel}">
</bean>
相当于:
<bean id="testSpel" value="org.xxx.xxx" />
<bean>
<property name="csdn" ref="testSpel">
</bean>
2.增加对属性编辑器
通过源码的查看,这里面无非就是注册一些常用的属性编辑器,并且能够自定义一些属性编辑器。
演示代码:
public class UserManager {
private Date dateValue;
public Date getDateValue() {
return dateValue;
}
public void setDateValue(Date dateValue) {
this.dateValue = dateValue;
}
@Override
public String toString() {
return "UserManager{" + "dateValue=" + dateValue + '}';
}
}
<bean id="userManager" class="org.learn.beans.customerPropertyEditor.UserManager">
<property name="dateValue">
<value>2018-08-01</value>
</property>
</bean>
public static void main(String[] args) {
ApplicationContext context = new ClassPathXmlApplicationContext("beanFactoryTest.xml");
UserManager userManager = (UserManager) context.getBean("userManager");
System.out.println(userManager);
}
// 报错
Caused by: org.springframework.beans.ConversionNotSupportedException: Failed to convert property value of type 'java.lang.String' to required type 'java.util.Date' for property 'dateValue';
nested exception is java.lang.IllegalStateException: Cannot convert value of type
'java.lang.String' to required type 'java.util.Date' for property 'dateValue': no matching editors or conversion strategy found
解决方法1:
// 继承 PropertyEditorSupport ,重写 setAsText方法
public class DatePropertyEditor extends PropertyEditorSupport {
private String format = "yyyy-MM-dd";
public void setFormat(String format) {
this.format = format;
}
@Override
public void setAsText(String text) throws IllegalArgumentException {
System.out.println("text : " + text);
SimpleDateFormat sdf = new SimpleDateFormat(format);
try {
Date d = sdf.parse(text);
this.setValue(d);
} catch (ParseException e) {
e.printStackTrace();
}
}
}
<bean class="org.springframework.beans.factory.config.CustomEditorConfigurer">
<property name="customEditors">
<map>
<entry key="java.util.Date"
value="org.learn.beans.customerPropertyEditor.DatePropertyEditor" />
</map>
</property>
</bean>
// 注意:上面这个是SPring 4之后的配置,Spring4之前配置如下,不同版本使用不同配置,否则允许会报错!
<bean class="org.springframework.beans.factory.config.CustomEditorConfigurer">
<property name="customEditors">
<map>
<entry key="java.util.Date">
<bean class="org.learn.beans.customerPropertyEditor.DatePropertyEditor">
<property name="format" value="yyyy-MM-dd"/>
</bean>
</entry>
</map>
</property>
</bean>
解决方法2:
实现Spring自带的属性编辑器 CustomerDateEditor
public class MyDatePropertyEditorRegistrar implements PropertyEditorRegistrar {
public void registerCustomEditors(PropertyEditorRegistry registry) {
registry.registerCustomEditor(Date.class,
new CustomDateEditor(new SimpleDateFormat("yyyy-MM-dd"),true));
}
}
//配置
<bean class="org.springframework.beans.factory.config.CustomEditorConfigurer">
<property name="propertyEditorRegistrars">
<list>
<bean class="org.learn.beans.customerPropertyEditor.MyDatePropertyEditorRegistrar"/>
</list>
</property>
</bean>
3.添加 ApplicationContextAwareProcessor 处理器
这一步主要的目的是注册一个 BeanPostProcessor,真正的逻辑还在 new ApplicationContextAwareProcessor中。
class ApplicationContextAwareProcessor implements BeanPostProcessor 。在实例化Bean的时候,也就是Spring激活bean的 init-method的前后,会有BeanPostProcessor的postProcessBeforeInitialization 和 postProcessAfterInitialization方法。
所以在 ApplicationContextAwareProcessor 处理器中我们也关注这两个方法。
public Object postProcessBeforeInitialization(final Object bean,String beanName) throws BeansException {
AccessControlContext acc = null;
if (System.getSecurityManager() != null &&
(bean instanceof EnvironmentAware || bean instanceof EmbeddedValueResolverAware ||
bean instanceof ResourceLoaderAware || bean instanceof ApplicationEventPublisherAware ||
bean instanceof MessageSourceAware || bean instanceof ApplicationContextAware)) {
acc = this.applicationContext.getBeanFactory().getAccessControlContext();
}
if (acc != null) {
// 使用了Aware接口的bean在被初始化后,可以获得一些对应的资源。
AccessController.doPrivileged((PrivilegedAction<Object>) () -> {
invokeAwareInterfaces(bean);
return null;
},acc);
}
else {
invokeAwareInterfaces(bean);
}
return bean;
}
private void invokeAwareInterfaces(Object bean) {
if (bean instanceof Aware) {
if (bean instanceof EnvironmentAware) {
((EnvironmentAware) bean).setEnvironment(this.applicationContext.getEnvironment());
}
if (bean instanceof EmbeddedValueResolverAware) {
((EmbeddedValueResolverAware) bean).setEmbeddedValueResolver(this.embeddedValueResolver);
}
if (bean instanceof ResourceLoaderAware) {
((ResourceLoaderAware) bean).setResourceLoader(this.applicationContext);
}
if (bean instanceof ApplicationEventPublisherAware) {
((ApplicationEventPublisherAware) bean).setApplicationEventPublisher(this.applicationContext);
}
if (bean instanceof MessageSourceAware) {
((MessageSourceAware) bean).setMessageSource(this.applicationContext);
}
if (bean instanceof ApplicationContextAware) {
((ApplicationContextAware) bean).setApplicationContext(this.applicationContext);
}
}
}
/**
* 这个方法没有做什么逻辑处理
* @param bean the new bean instance
* @param beanName the name of the bean
* @return
*/
@Override
public Object postProcessAfterInitialization(Object bean,String beanName) {
return bean;
}
4.设置忽略依赖
因为在上面postProcess操作中,实现了Awar接口的bean已经不是普通的bean了,如ResourceLoaderAware等,那么需要在SPring做bean的依赖注入的时候忽略它们。
5.注册依赖
2.2.4 对BeanFactory 的后处理
BeanFactory作为Spring中容器功能的基础,用于存放所有已经加载的bean,为了保证程序的高可扩展性,Spring针对BeanFactory做了大量的扩展,如PostProcessor等。
2.2.5 激活注册的BeanFactoryPostProcessor
下面是Spring 5 中的BeanFactoryPostProcessor源码,函数式接口
@FunctionalInterface
public interface BeanFactoryPostProcessor {
/**
* Modify the application context's internal bean factory after its standard
* initialization. All bean definitions will have been loaded,but no beans
* will have been instantiated yet. This allows for overriding or adding
* properties even to eager-initializing beans.
* 在标准初始化之后修改应用程序上下文的内部bean工厂。
* 将加载所有bean定义,但尚未实例化任何bean。 这允许覆盖或添加属性,甚至是初始化bean。
*
* @param beanFactory the bean factory used by the application context
* @throws org.springframework.beans.BeansException in case of errors
*/
void postProcessBeanFactory(ConfigurableListableBeanFactory beanFactory) throws BeansException;
}
BeanFactoryPostProcessor和 BeanPostProcessor可以对bean的定义(配置元数据)进行处理,也就是说,Spring Ioc 容器允许 BeanFactoryPostProcessor 在容器实际 实例化任何 其他的bean 之前 读取配置元数据,并有可能修改它。
需要强调的一点,就是如果你想改变实际bean的实例,那么你最好是用 BeanPostProcessor ! 因为 BeanFactoryPostProcessor 的作用域范围是容器级的,只和你所使用的容器相关。
BeanFactoryPostProcessor不会对另一个容器的bean进行后置处理。即使这两个容器都是在同一个层次上,Spring中存在对于BeanFactoryPostProcessor的典型应用。比如 PropertyPlaceholderConfigurer.
(1) BeanFactoryPostProcessor的典型应用PropertyPlaceholderConfigurer
在spring配置的xml中,如配置datasource的时候可能会配置如下:
<property name="driverClassName" value="${DBCP.DataSource.driver}" />
<property name="url" value="${DBCP.DataSource.url}" />
<property name="username" value="${DBCP.DataSource.username}" />
<property name="password" value="${DBCP.DataSource.dbpassword}" />
这个配置里面使用了变量引用:${DBCP.DataSource.url}等,这就是spring分散配置,可以在另外的配置文件中为${DBCP.DataSource.url}等指定值。比如我在db.properties中指定:
DBCP.DataSource.driver=com.mysql.jdbc.Driver
Spring 框架是怎么知道存在这样的配置文件呢?
这就要靠 PropertyPlaceholderConfigurer 这个类的bean。
<bean id="dbProperties"
class="org.springframework.beans.factory.config.PropertyPlaceholderConfigurer">
<property name="location">
<value>classpath:db.properties</value>
</property>
</bean>
BeanFacotryPostProcessor接口间接继承了BeanFacotryPostProcessor接口,这是一个特别的接口,当Spring加载任何实现了这个接口的bean的配置时,都会在bean工厂载入所有bean的配置之后执行postProcessBeanFactroy方法。
在BeanFacotryPostProcessor类中,实现了postProcessBeanFactory方法。如下:
@Override
public void postProcessBeanFactory(ConfigurableListableBeanFactory beanFactory) throws BeansException {
try {
// 合并属性
Properties mergedProps = mergeProperties();
// Convert the merged properties,if necessary.
// 如果需要,转换合并的属性
convertProperties(mergedProps);
// Let the subclass process the properties.
// 让子类处理属性。空实现
processProperties(beanFactory,mergedProps);
}
catch (IOException ex) {
throw new BeanInitializationException("Could not load properties",ex);
}
}
通过 mergeProperties 、 convertProperties 、 processProperties 这三个方法,分别得到配置,将得到的配置转换为合适的类型,最后将配置内容告诉 BeanFactory。
(2) 使用自定义的 BeanFactoryPostProcessor
实现该接口,可以在spring的bean创建之前,修改bean的定义属性。也就是说,Spring允许BeanFactoryPostProcessor在容器实例化任何其它bean之前读取配置元数据,并可以根据需要进行修改,例如可以把bean的scope从singleton改为prototype,也可以把property的值给修改掉。可以同时配置多个BeanFactoryPostProcessor,并通过设置’order’属性来控制各个BeanFactoryPostProcessor的执行次序。
注意:BeanFactoryPostProcessor是在spring容器加载了bean的定义文件之后,在bean实例化之前执行的。接口方法的入参是ConfigurrableListableBeanFactory,使用该参数,可以获取到相关bean的定义信息。
// 测试的类
public class MyTestBean {
private String name;
private String desc;
public String getName() {
return name;
}
public void setName(String name) {
this.name = name;
}
public String getDesc() {
return desc;
}
public void setDesc(String desc) {
this.desc = desc;
}
@Override
public String toString() {
return "MyTestBean{" + "name='" + name + ''' + ",desc='" + desc + ''' + '}';
}
}
// 自定义实现 postProcessBeanFactory
public class MyBeanFactoryPostProcessor implements BeanFactoryPostProcessor{
public void postProcessBeanFactory(ConfigurableListableBeanFactory beanFactory) throws BeansException {
System.out.println("调用MyBeanFactoryPostProcessor的postProcessBeanFactory");
BeanDefinition bd = beanFactory.getBeanDefinition("myTestBean");
System.out.println("属性值============" + bd.getPropertyValues().toString());
MutablePropertyValues pv = bd.getPropertyValues();
if (pv.contains("desc")) {
pv.addPropertyValue("desc","best!");
}
}
}
// xml配置
<bean id="myTestBean" class="org.learn.beans.MyTestBean">
<property name="name" value="spring"/>
<property name="desc" value="good"/>
</bean>
<bean id="myBeanFactoryPostProcessor" class="org.learn.beans.customerPropertyEditor.MyBeanFactoryPostProcessor" />
// 运行结果
ApplicationContext context = new ClassPathXmlApplicationContext("beanFactoryTest.xml");
MyTestBean testBean = (MyTestBean) context.getBean("myTestBean");
System.out.println(testBean);
调用MyBeanFactoryPostProcessor的postProcessBeanFactory
属性值============PropertyValues: length=2; bean property 'name'; bean property 'desc'
MyTestBean{name='spring',desc='best!'}
2.2.6 注册的BeanPostProcessor
Spring中大部分功能都是通过后处理器的方式进行扩展的,这是Spring框架的一个特性。这里探索一个BeanPostProcessor的注册,真正的调用是在bean实例化阶段进行的。在Spring的BeanFactory中并没有自动注册后处理器,所以在调用的时候没有注册是不能使用的。
对比分析总结 BeanFactoryPostProcessor和 BeanPostProcessor:
BeanFactoryPostProcessor在bean实例化之前执行,之后实例化bean(调用构造函数,并调用set方法注入属性值),然后在调用BeanPostProcessor的两个初始化方法前后!
2.2.7 初始化消息资源- initMessageSource();
Spring国际化的相关功能,读取并将自定义的资源文件配置记录到容器中,在获取资源文件的时候直接使用。
2.2.8 初始化ApplicationEventMulticaster - initApplicationEventMulticaster
在讲解Spring的事件传播之前,先了解一下事件监听的简单用法。
1.定义监听事件
public class MyEvent extends ApplicationEvent {
private String msg;
/**
* Create a new ApplicationEvent.
* @param source the object on which the event initially occurred (never {@code null})
*/
public MyEvent(Object source) {
super(source);
}
public MyEvent(Object source,String msg) {
super(source);
this.msg = msg;
}
public void show(){
System.out.println(msg);
}
}
2.定义监听器
public class MyListener implements ApplicationListener<MyEvent> {
public void onApplicationEvent(MyEvent event) {
event.show();
}
}
3.配置监听器
<bean id="myListener" class="org.learn.beans.event.MyListener"/>
4.测试
ApplicationContext context = new ClassPathXmlApplicationContext("beanFactoryTest.xml");
MyEvent event = new MyEvent("hello","world");
context.publishEvent(event);
当程序运行Spring会将发出的Event事件转给我们自定义的Listener进行处理。这里其实是用了 设计模式中 观察者模式。
2.2.9注册监听器 registerListeners();
在所有注册的Bean中查找Listener bean,注册到消息广播器中。
protected void registerListeners() {
// Register statically specified listeners first.
// 首先注册静态指定的监听器。
for (ApplicationListener<?> listener : getApplicationListeners()) {
getApplicationEventMulticaster().addApplicationListener(listener);
}
// Do not initialize FactoryBeans here: We need to leave all regular beans
// uninitialized to let post-processors apply to them!
String[] listenerBeanNames = getBeanNamesForType(ApplicationListener.class,false);
for (String listenerBeanName : listenerBeanNames) {
getApplicationEventMulticaster().addApplicationListenerBean(listenerBeanName);
}
// Publish early application events now that we finally have a multicaster...
// 拥有了一个多播器,发布早期应用程序事件……
Set<ApplicationEvent> earlyEventsToProcess = this.earlyApplicationEvents;
this.earlyApplicationEvents = null;
if (earlyEventsToProcess != null) {
for (ApplicationEvent earlyEvent : earlyEventsToProcess) {
getApplicationEventMulticaster().multicastEvent(earlyEvent);
}
}
}
2.2.10 初始化非延迟加载单例 - finishBeanFactoryInitialization(beanFactory);
完成了BeanFactory的初始化工作,其中包括ConversionService的设置,配置冻结以及非延迟加载的bean的初始化工作。
/**
* Finish the initialization of this context's bean factory,
* initializing all remaining singleton beans.
* 完成此上下文的bean工厂的初始化,
* 初始化所有剩余的单例bean
*/
protected void finishBeanFactoryInitialization(ConfigurableListableBeanFactory beanFactory) {
// Initialize conversion service for this context.
// 初始化此上下文的转换服务。
if (beanFactory.containsBean(CONVERSION_SERVICE_BEAN_NAME) &&
beanFactory.isTypeMatch(CONVERSION_SERVICE_BEAN_NAME,ConversionService.class)) {
beanFactory.setConversionService(
beanFactory.getBean(CONVERSION_SERVICE_BEAN_NAME,ConversionService.class));
}
// Register a default embedded value resolver if no bean post-processor
// (such as a PropertyPlaceholderConfigurer bean) registered any before:
// at this point,primarily for resolution in annotation attribute values.
if (!beanFactory.hasEmbeddedValueResolver()) {
beanFactory.addEmbeddedValueResolver(strVal -> getEnvironment().resolvePlaceholders(strVal));
}
// Initialize LoadTimeWeaverAware beans early to allow for registering their transformers early.
String[] weaverAwareNames = beanFactory.getBeanNamesForType(LoadTimeWeaverAware.class,false,false);
for (String weaverAwareName : weaverAwareNames) {
getBean(weaverAwareName);
}
// Stop using the temporary ClassLoader for type matching.
// 停止使用临时类加载器进行类型匹配
beanFactory.setTempClassLoader(null);
// Allow for caching all bean definition metadata,not expecting further changes.
// 允许缓存所有bean定义元数据,而不期望进一步的更改。
beanFactory.freezeConfiguration();
// Instantiate all remaining (non-lazy-init) singletons.
// 实例化所有剩余的(非惰性初始化)单例。
beanFactory.preInstantiateSingletons();
}
主要是ConversionService的设置,它能够提供一个转换器,我们可以自定义转换器。然后冻结配置,最后就是加载所有非延迟的bean。
ApplicationContext实现的默认行为就是启动时将所有单例bean提前进行实例化。提前的好处就是更早的发现配置中的错误。
2.2.11 finishRefresh();
最后一步,完成刷新过程,通知生命周期处理器initLifecycleProcessor刷新过程,同时发出 ContextRefreshedEvent通知别人。
Spring 提供了Lifecylce接口,LifeCycle中包含start/stop 方法,实现此接口后Spring会保证在启动的时候调用其start方法开始生命周期,并在Spring关闭的时候调用stop方法结束生命周期。
““
protected void finishRefresh() {
// Clear context-level resource caches (such as ASM metadata from scanning).
// 清除上下文级资源缓存(如扫描的ASM元数据)。
clearResourceCaches();
// Initialize lifecycle processor for this context.
// 为这个上下文初始化生命周期处理器。
initLifecycleProcessor();
// Propagate refresh to lifecycle processor first.
//首先将refresh传播到生命周期处理器。
getLifecycleProcessor().onRefresh();
// Publish the final event. 发布最后的事件
publishEvent(new ContextRefreshedEvent(this));
// Participate in LiveBeansView MBean,if active.
// 参与LiveBeansView MBean,如果激活。
LiveBeansView.registerApplicationContext(this);
}
“`
1.initLifecycleProcessor();
当ApplicationContext启动或者停止的时候,它会通过LifeCycleProcessor来所有申明的bean的周期做状态更新。所有需要对LifecyceleProcessor进行初始化。
2.onRefresh,启动所有实现LifeCycle接口的bean。
3.publishEvent,当完成ApplicationContext初始化的时候,要通过Spring中的事件发布机制来发出ContextRefreshedEvent事件,保证对应的监听器做进一步的逻辑处理。
容器的扩展搞完了,懵懵懂懂!Spring挺复杂的,看完也是一个大概的了解,对于里面的具体代码实现,还不是很清楚。本篇是学习笔记,参考《Spring源码深度解析》!
登录后自动展开